INSTALLATION GUIDE

|
Please note: This installation guide has been written specifically for New Zealand and differs from the factory installation guide found in the Karelia packs. You can also download it here. |
Please ensure that the person installing the flooring reads this guide carefully prior to installation.
Quality Floors Ltd will not be held responsible if installation is not done according to this guide!
If you have any questions please ensure you contact us PRIOR to commencing installation.
Quality Floors Ltd will not be held responsible if installation is not done according to this guide!
If you have any questions please ensure you contact us PRIOR to commencing installation.
INTRODUCTION
Karelia has been invented in and designed for the Northern Hemisphere (e.g. Europe, USA/Canada, Russia).
These countries have a dryer climate with a lower relative humidity (RH) than New Zealand.
RH for your comparison:
Europe, USA and Australia have an average RH of approx. 50 - 60 %
These countries have a dryer climate with a lower relative humidity (RH) than New Zealand.
RH for your comparison:
Europe, USA and Australia have an average RH of approx. 50 - 60 %
RH |
Summer |
Winter |
Average |
Auckland |
74% |
84% |
79% |
Wellington |
67% |
78% |
73% |
Christchurch |
73% |
84% |
79% |
Queenstown |
75% |
83% |
79% |
The construction method in New Zealand is also different compared to those markets:
Due to the high humidity and different construction method, it is in your own best interest to install a Karelia timber floor in a way that has been proven to work in New Zealand for more than 10 years.
Based on our experience in New Zealand, Quality Floors Ltd's preferred installation method is glue down. However, it is also possible to install Karelia as a floating floor.
The most suitable installation method for your situation depends on a number of variables.
Please contact us PRIOR to installation to get advice on which method to employ.
Karelia requires extra care when installing on underfloor heating. Please ensure you contact us PRIOR to installation to discuss.
- Houses are built with a larger footprint as opposed to high rise buildings
- Particle board or plywood substrates are more common
- Larger open plan areas for timber flooring on one level
- Concrete slab is poured to U3 standard (often not level enough for timber flooring)
Due to the high humidity and different construction method, it is in your own best interest to install a Karelia timber floor in a way that has been proven to work in New Zealand for more than 10 years.
Based on our experience in New Zealand, Quality Floors Ltd's preferred installation method is glue down. However, it is also possible to install Karelia as a floating floor.
The most suitable installation method for your situation depends on a number of variables.
Please contact us PRIOR to installation to get advice on which method to employ.
Karelia requires extra care when installing on underfloor heating. Please ensure you contact us PRIOR to installation to discuss.
PRIOR TO INSTALLATION
STORAGE:
Store the unopened Karelia packs in a dry, covered place, off the ground (on pallet or similar).
ACCLIMATISING:
We recommend storing the unopened packs in the installation area for 1 to 2 weeks.
Do not open the packs prior to installing!
TIMING OF INSTALLATION:
Karelia should be installed second to last in the building/renovation process (carpet is last).
Karelia is pre-finished so avoid as much traffic (builders, trades people, etc) as possible once installed.
Install kitchen units and similar prior to Karelia (especially when installing Karelia as a floating floor). Heavy units will create pressure on the timber and potentially lift the floor in a different area (does not apply to glue down installations).
We do not recommend covering the timber floor after installation to protect it against foot traffic. Dust and dirt will still find its way between the timber and the cover.
If the installed flooring needs to be covered, we recommend using "Ram Board" or similar and covering the entire timber floor.
Ensure you don't use any tape directly on the floor: fix the "Ram Board" by applying low tac masking tape to skirting boards instead.
Overlay cardboard in the middle of the room, and join using tape on top of the cardboard, not on the timber floor.
If tape is used on the timber floor, the coating may peel off when the tape is removed. In addition, as soon as a timber floor is exposed to UV light, it starts changing the colour, hence we recommend covering the entire area.
SUBFLOORS / FLOOR PREPARATION
Karelia hardwood flooring can be installed on concrete or wooden substrates (particle board, ply or existing T&G floors). It is also possible to install Karelia on existing cork or vinyl (floating floor installation only).
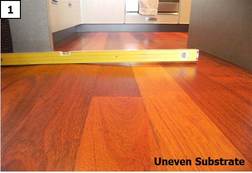
The subfloor must be dry, clean and level to within 3mm over 3 linear meters (industry standard). To check if floor is level, use a straight edge at least 2m in length over the entire area (Image 1). Any deviation in height should not exceed 2-3mm.
The subfloor must be dry, clean and level to within 3mm over 3 linear meters (industry standard). To check if floor is level, use a straight edge at least 2m in length over the entire area (Image 1). Any deviation in height should not exceed 2-3mm.
|
If the subfloor exceeds this given tolerance we recommend the following:
Wooden substrate: fasten any loose floor boards / panels, then sand or use a levelling component Concrete substrate: grind or use a levelling component Existing cork or vinyl: remove existing floor, sand / grind subfloor and use a levelling component |
|
GLUE-DOWN INSTALLATION (recommended)
On a Wooden Substrate:
Check that the subfloor is level and prepare the floor if necessary as per above.
We always recommend sanding the subfloor to achieve the best bonding with the adhesive.
If installing onto existing floorboards we recommend installing Karelia across the existing floorboards.
On a Concrete Substrate:
Check that the subfloor is level and prepare the floor if necessary as per above.
If gluing Karelia direct onto concrete, the relative humidity (RH) of the concrete must get measured.
New Zealand's flooring industry regulations stipulate that the RH of a concrete slab must be less than 70% to allow installing a timber floor without first applying a moisture barrier onto the concrete.
If the RH exceeds 70% you MUST apply a moisture barrier prior to installation.
Floor NZ (www.floornz.org.nz), the NZ governing body for standards in the flooring industry, names the hygrometer to be the only appropriate instrument to measure the RH of a concrete slab.
Please contact us for the correct usage of a hygrometer.
The majority of professional timber floor installation companies apply a moisture barrier regardless of RH reading to minimise the risk of potential moisture issues.
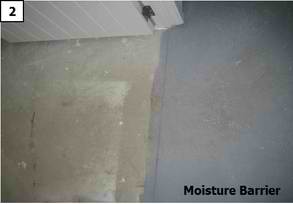
We ALWAYS recommend you apply a moisture barrier from trusted brands such as Bostik, Selleys or Sika (Image 2).
Adhesive:
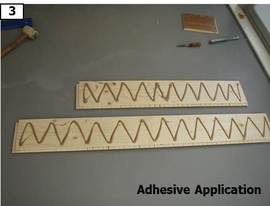
We recommend industry standard adhesives in sausage form (Sika, Bostik, etc). These are applied with a sausage gun onto the back of the board. The adhesive should be applied zig-zag wise, about 100mm apart (Image 3). Install board by board and try to avoid adhesive on the surface. If adhesive gets on the surface, wipe it off straight away with a damp cloth. There is no need for gluing the interlocking system.
If gluing onto concrete and using a moisture barrier, ensure you use a system = moisture barrier and adhesive from the same brand.
Check that the subfloor is level and prepare the floor if necessary as per above.
We always recommend sanding the subfloor to achieve the best bonding with the adhesive.
If installing onto existing floorboards we recommend installing Karelia across the existing floorboards.
On a Concrete Substrate:
Check that the subfloor is level and prepare the floor if necessary as per above.
If gluing Karelia direct onto concrete, the relative humidity (RH) of the concrete must get measured.
New Zealand's flooring industry regulations stipulate that the RH of a concrete slab must be less than 70% to allow installing a timber floor without first applying a moisture barrier onto the concrete.
If the RH exceeds 70% you MUST apply a moisture barrier prior to installation.
Floor NZ (www.floornz.org.nz), the NZ governing body for standards in the flooring industry, names the hygrometer to be the only appropriate instrument to measure the RH of a concrete slab.
Please contact us for the correct usage of a hygrometer.
The majority of professional timber floor installation companies apply a moisture barrier regardless of RH reading to minimise the risk of potential moisture issues.
We ALWAYS recommend you apply a moisture barrier from trusted brands such as Bostik, Selleys or Sika (Image 2).
Adhesive:
We recommend industry standard adhesives in sausage form (Sika, Bostik, etc). These are applied with a sausage gun onto the back of the board. The adhesive should be applied zig-zag wise, about 100mm apart (Image 3). Install board by board and try to avoid adhesive on the surface. If adhesive gets on the surface, wipe it off straight away with a damp cloth. There is no need for gluing the interlocking system.
If gluing onto concrete and using a moisture barrier, ensure you use a system = moisture barrier and adhesive from the same brand.
|
|
FLOATING FLOOR INSTALLATION
On a Wooden Substrate:
Check that the subfloor is level and prepare the floor if necessary as per above.
If installing onto existing floorboards we recommend installing Karelia across the existing floorboards.
On a Concrete Substrate:
Check that the subfloor is level and prepare the floor if necessary as per above.
Relative humidity (RH) of the concrete must be measured prior to installation.
We strongly recommend putting a plastic sheet (PE) of 0.2mm or thicker on the concrete first and then use an underlay which has an integrated moisture barrier, regardless of the RH of the slab.
Check that the subfloor is level and prepare the floor if necessary as per above.
If installing onto existing floorboards we recommend installing Karelia across the existing floorboards.
On a Concrete Substrate:
Check that the subfloor is level and prepare the floor if necessary as per above.
Relative humidity (RH) of the concrete must be measured prior to installation.
We strongly recommend putting a plastic sheet (PE) of 0.2mm or thicker on the concrete first and then use an underlay which has an integrated moisture barrier, regardless of the RH of the slab.
|
Underlay:
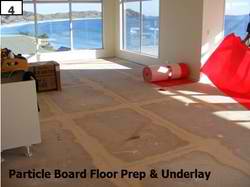
There are may underlays available in New Zealand for floating timber floor installations. If your substrate is concrete, it is important that you use an underlay which has an integrated moisture barrier, such as "Roberts Harmony" (Image 4). We are happy to advise the best underlay for your application. |
We strongly recommend using a crosslinking PVA glue (e.g. Roberts) for the interlocking system when installing Karelia as a floating floor installation. This eliminates possible squeaking noises that may occur with floating floors.There are may underlays available in New Zealand for floating timber floor installations.
If your substrate is concrete, it is important that you use an underlay which has an integrated moisture barrier, such as "Roberts Harmony" (Image 4).
We are happy to advise the best underlay for your application.
We strongly recommend using a crosslinking PVA glue (e.g. Roberts) for the interlocking system when installing Karelia as a floating floor installation. This eliminates possible squeaking noises that may occur with floating floors.
INSTALLATION
Prior to installing boards, ensure substrate is level.
If floating the floor, lay out the underlay according to manufacturer's instructions.
If gluing down the floor, only use adhesive as the installation progresses. If substrate is concrete, seal with moisture barrier according to manufacturer's instructions.
Open 2-3 packs to begin with and mix the boards, then open packs as required. Check all boards prior to installing for damage/defects. Should you find a defective/damaged board, this can be installed in an unexposed area (ie under a dishwasher or fridge) or in a cupboard/wardrobe if applicable.
Laying direction:
Try to lay the boards in the direction of incoming light or parallel to the longer wall.
If you lay Karelia on an existing T&G wooden floor, it is recommended you lay the boards crosswise.
Expansion allowance:
Please ensure you read and understand the introduction of this installation guide.
|
The timber comes in shrink wrapped packs with a moisture content lower than the New Zealand environment. This means the timber will start expanding as soon as you open a pack.
Once the installed Karelia floor has acclimatised to the environment, expansion from thereon will be according to the relative humidity of the air, but never back to its original size. |
|
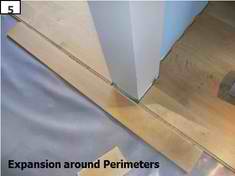
With any timber floor and expansion, the golden rule is: "less is more"!
Leave as much expansion as you can around the perimeters, preferably at least 7-10mm. The gap can be covered with skirting boards, cover strips, quad moulding, etc (Image 5).
Use wedges to maintain the expansion gap when installing.
Remember to also leave expansion gaps around thresholds, pillars, etc. and to undercut door frames.
Please note: Karelia expands 6 times more across the width of a board than across the length.
If you decide to install Karelia as a floating floor please note the following:
After every 8 linear meters of installed Karelia, an expansion joint must be inserted, regardless of the laying direction.
In larger open plan areas we recommend lining up the gib boards approximately 20mm off the ground or undercutting them to achieve more room for expansion.
Karelia expands substantially more if installed as a floating floor than as a glue down.
Starting place:
Ensure skirting boards and kitchen toe kicks are removed / off.
Measure the width of the room, and calculate how many rows of boards are required. If the width of the last row is less than 40mm, cut the first row of boards to a narrower width.
Start from a solid wall. First check with a cord that the wall is straight. A straight and solid starting line is crucial for successful installation. When necessary, draw a line matching the shape of the wall on the first boards and cut them to that shape.
Installing:
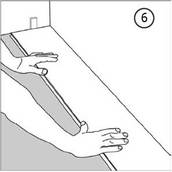
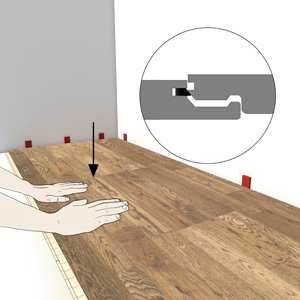
Install the boards from left to right (Image 6). Always remove the tongues from the first row of boards to ensure the expansion gap is wide enough. Do this with beginning and end joints too.
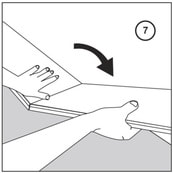
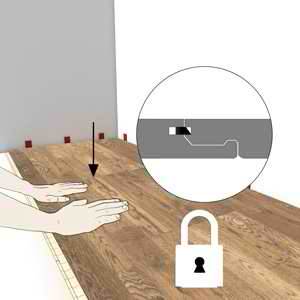
Install the next board with its short side (Image 7) at an angle to the previous board, and lower the board carefully onto the floor, while pushing the end groove and tongue joints together. Proceed in this manner to the end of the first row.
** You can 'ease' the end joint into the locking position by slightly waggling the board up and down while installing it.
Be careful not to damage the end cleat. Be careful not to bend the boards forcibly, since this causes micro-fractures in the varnished surface.
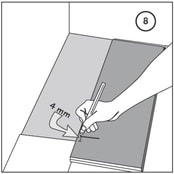
Cut the last board of the row to size, taking the expansion gap into account, and install the board.
** You can achieve the correct length by turning the short side tongue to face the wall, and marking the correct cut-off point (Image 8).
Leave as much expansion as you can around the perimeters, preferably at least 7-10mm. The gap can be covered with skirting boards, cover strips, quad moulding, etc (Image 5).
Use wedges to maintain the expansion gap when installing.
Remember to also leave expansion gaps around thresholds, pillars, etc. and to undercut door frames.
Please note: Karelia expands 6 times more across the width of a board than across the length.
If you decide to install Karelia as a floating floor please note the following:
After every 8 linear meters of installed Karelia, an expansion joint must be inserted, regardless of the laying direction.
In larger open plan areas we recommend lining up the gib boards approximately 20mm off the ground or undercutting them to achieve more room for expansion.
Karelia expands substantially more if installed as a floating floor than as a glue down.
Starting place:
Ensure skirting boards and kitchen toe kicks are removed / off.
Measure the width of the room, and calculate how many rows of boards are required. If the width of the last row is less than 40mm, cut the first row of boards to a narrower width.
Start from a solid wall. First check with a cord that the wall is straight. A straight and solid starting line is crucial for successful installation. When necessary, draw a line matching the shape of the wall on the first boards and cut them to that shape.
Installing:
Install the boards from left to right (Image 6). Always remove the tongues from the first row of boards to ensure the expansion gap is wide enough. Do this with beginning and end joints too.
Install the next board with its short side (Image 7) at an angle to the previous board, and lower the board carefully onto the floor, while pushing the end groove and tongue joints together. Proceed in this manner to the end of the first row.
** You can 'ease' the end joint into the locking position by slightly waggling the board up and down while installing it.
Be careful not to damage the end cleat. Be careful not to bend the boards forcibly, since this causes micro-fractures in the varnished surface.
Cut the last board of the row to size, taking the expansion gap into account, and install the board.
** You can achieve the correct length by turning the short side tongue to face the wall, and marking the correct cut-off point (Image 8).
|
|
|
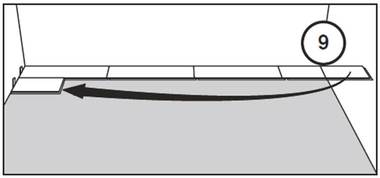
Start the next row with the left-over piece (if this is less than 500mm, then discard, cut a board in half, and begin). The overlap should be no less than 500mm (Image 9).
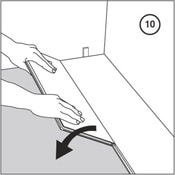
Install the next row's first board at a slight angle to the previous row's board and lay it on the floor (Image 10). If there is a slight gap between the joints, make sure that the previous row's board groove is clean.
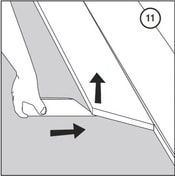
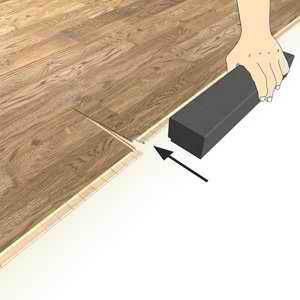
Use an installation wedge (45 degree cut block of timber), place around 50mm from the end of the previously installed board (Image 11).
Install the next row's first board at a slight angle to the previous row's board and lay it on the floor (Image 10). If there is a slight gap between the joints, make sure that the previous row's board groove is clean.
Use an installation wedge (45 degree cut block of timber), place around 50mm from the end of the previously installed board (Image 11).
|
|
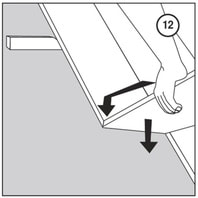
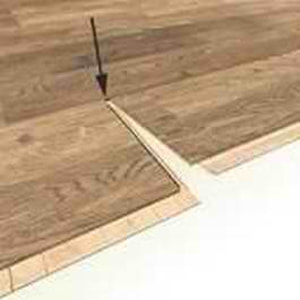
First install the next board's short side at a slight angle to the previous board, and then install the long side. Push the board simultaneously forward and downwards towards the floor at a similar angle to the previous board (Image 12).
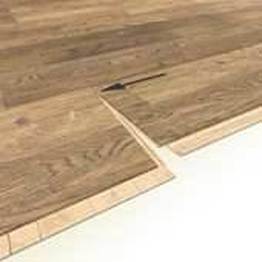
Remove the wedge and tap (not bang!) the boards into place with the edge, making the side joints tight in the process (Image 13).
Please see under Tips & Tricks for further information regarding overstriking.
After installing three to four rows, check the wooden floor's expansion gaps, and adjust if necessary.
As you progress through the installation please note that the joints for adjoining rows should be staggered randomly and never less than 500mm apart. This is particularly crucial when installing Karelia as a floating floor installation (Image 14).
|
|

|
Last Row:
Measure the width required by the last row of boards at several points (remembering the expansion gap), mark the cutting line and cut the boards to the appropriate size. Install the boards and tighten them into place.
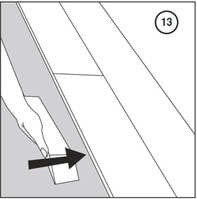
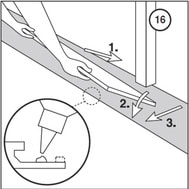
If the last row of boards must be installed under a door frame, cut away the locking edge (Image 15), apply crosslinking PVA glue to the groove, and install the board (Image 16).
Measure the width required by the last row of boards at several points (remembering the expansion gap), mark the cutting line and cut the boards to the appropriate size. Install the boards and tighten them into place.
If the last row of boards must be installed under a door frame, cut away the locking edge (Image 15), apply crosslinking PVA glue to the groove, and install the board (Image 16).

|
|
Finishing:
Wipe any glue stains off the floor with a damp cloth.
Install the skirting boards, kitchen toe kicks, trim bars, etc. Do not install the skirtings too tightly against the floor, or fasten the bars through the wooden floor as this will restrict the floor's natural movement.
Wipe any glue stains off the floor with a damp cloth.
Install the skirting boards, kitchen toe kicks, trim bars, etc. Do not install the skirtings too tightly against the floor, or fasten the bars through the wooden floor as this will restrict the floor's natural movement.
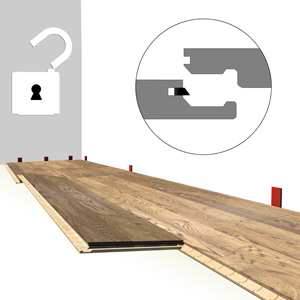
PROFILOC 5G
Introduction:
Karelia have recently introduced the next generation interlocking/joint system called Profiloc 5G.This is an upgrade of the current 2G system. During the transition period, Quality Floors will supply either 2G or 5G, depending on the product purchased and quantity ordered.
To identify which interlocking system you have, please refer to the package label: 5G products will clearly be marked '5G', whereas 2G products will simply mention 'Profiloc'.
Alternatively, feel free to contact your point of purchase, and they can advise which system you have.
Advantages:
The advantages of the new Profiloc 5G interlocking system are:
Installation:
The 5G interlocking system is very precise, therefore it is sensitive - please inspect it carefully prior to installation. Pay close attention to the black 'plastic' locking mechanism at the short end of the board, and ensure it is not damaged/has fallen out/hampered by dirt.
Should a board with a defective interlock be installed, this could cause the board to 'pop' or become 'lippy' at a later date. The only solution to remedy this is to replace the board. Please note that this would then become an installation issue, not a product fault.
Below are the images that apply to 5G installations:
Karelia have recently introduced the next generation interlocking/joint system called Profiloc 5G.This is an upgrade of the current 2G system. During the transition period, Quality Floors will supply either 2G or 5G, depending on the product purchased and quantity ordered.
To identify which interlocking system you have, please refer to the package label: 5G products will clearly be marked '5G', whereas 2G products will simply mention 'Profiloc'.
Alternatively, feel free to contact your point of purchase, and they can advise which system you have.
Advantages:
The advantages of the new Profiloc 5G interlocking system are:
- Easier and faster installation, as boards are connected vertically instead of using a specific angle
- Simpler when installing in tricky corners or when fine-tuning is needed
- Easier to install the last row, especially when the board has been cut to size
Installation:
The 5G interlocking system is very precise, therefore it is sensitive - please inspect it carefully prior to installation. Pay close attention to the black 'plastic' locking mechanism at the short end of the board, and ensure it is not damaged/has fallen out/hampered by dirt.
Should a board with a defective interlock be installed, this could cause the board to 'pop' or become 'lippy' at a later date. The only solution to remedy this is to replace the board. Please note that this would then become an installation issue, not a product fault.
Below are the images that apply to 5G installations:
|
|
|
|
|
|
TIPS & TRICKS
Cutting Door Frames, Undercutting Skirtings, etc:
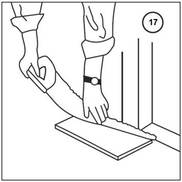
Place a loose board (plus underlay if being used) on the floor next to the door frame/skirting. This will give you the correct height to saw into the door frame and enable you to push the boards under, while taking a sufficient expansion gap into account (Image 17).
Narrow Hallways / Galley Kitchens:
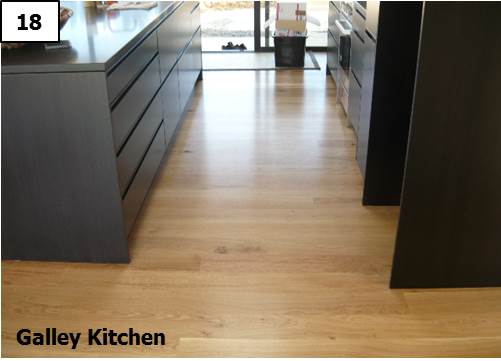
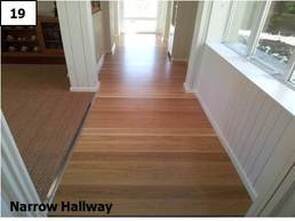
If you are doing a floating floor installation, and the installation direction is crosswise eg a narrow hallway (Images 18 & 19), cut the backing & middle layer of all the boards at two or three points. These cuts should be made diagonally to every board at a 45 degree angle either by using a saw or carpet knife. Please ensure you don't cut into the top/wear layer.
Do not use full length boards only in these areas! You have to make an end joint for every second row of boards (ie. two half boards in a row).
Place a loose board (plus underlay if being used) on the floor next to the door frame/skirting. This will give you the correct height to saw into the door frame and enable you to push the boards under, while taking a sufficient expansion gap into account (Image 17).
Narrow Hallways / Galley Kitchens:
If you are doing a floating floor installation, and the installation direction is crosswise eg a narrow hallway (Images 18 & 19), cut the backing & middle layer of all the boards at two or three points. These cuts should be made diagonally to every board at a 45 degree angle either by using a saw or carpet knife. Please ensure you don't cut into the top/wear layer.
Do not use full length boards only in these areas! You have to make an end joint for every second row of boards (ie. two half boards in a row).
|
|
|
Removing the Locking Edge:
If you cannot tilt a board lengthwise or width-wise when installing, you can remove the locking edge by using a chisel or similar (Image 15). The board can then be installed by sliding it horizontally. In these cases, you should apply crosslinking PVA glue to the tongue-and-groove structure.
Overstriking:
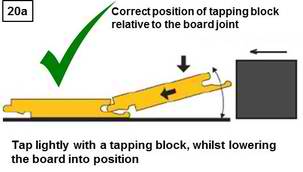
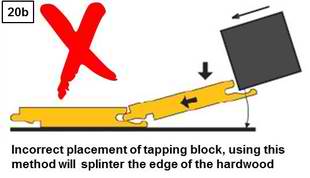
Overstriking occurs when the cells of the timber are damaged at the edge of the flooring. This can happen by placing a tapping block, or worse an offcut, at the wrong spot when tapping the boards together. Splintering may then occur, not immediately, but up to a few months after installation. See Image 20a & 20b for correct placement of block.
If you cannot tilt a board lengthwise or width-wise when installing, you can remove the locking edge by using a chisel or similar (Image 15). The board can then be installed by sliding it horizontally. In these cases, you should apply crosslinking PVA glue to the tongue-and-groove structure.
Overstriking:
Overstriking occurs when the cells of the timber are damaged at the edge of the flooring. This can happen by placing a tapping block, or worse an offcut, at the wrong spot when tapping the boards together. Splintering may then occur, not immediately, but up to a few months after installation. See Image 20a & 20b for correct placement of block.
|
|
Disclaimer:
Responsibility lies with the person who is installing to determine if the sub-floor is acceptable for the timber flooring installation. Quality Floors Ltd (QFL) is not responsible for timber flooring failure due to sub-floor deficiencies or lack of preparation.
Karelia is a natural wood product. Therefore natural variations in colour, tone and grain are to be expected. Again, it is the responsibility of the person installing to inspect each Karelia board carefully before installation.
QFL does not take responsibility for boards with visible defects once they are installed. QFL will not take any responsibility for moisture issues caused by the subfloor, trades people or faulty appliances. QFL can not be held liable for any installation related potential issues eg expansion, uneven subfloor or moisture issues.
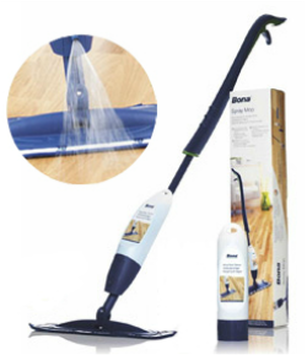
Bona Cleaning Kit
|
Bringing out the Best in Wooden Floors... The new Spray Mop from Bona enables you to clean and maintain your wooden floor in a sweep. No longer is there a need to fill up a big bucket of water to clean your floors effectively. The cleaning kit contains:
|
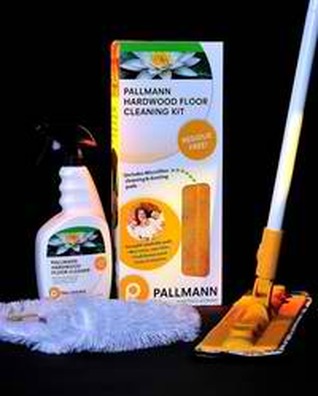
Palman Cleaning Kit
|
This is the professional cleaning kit for EVERY hardwood floor. The kit is developed by Pallmann, a world leader in timber flooring cleaning products from USA. It is designed for sealed, oiled, waxed wooden and cork floors. The cleaning kit contains:
|
KARELIA MAINTENANCE GUIDE

|
You can also download it here. |
|
The surface of Karelia wood flooring has been pre-finished with UV-hardened acrylic lacquer or oil/wax.
In order to maintain the beauty of your Karelia floor, follow our simple maintenance instructions. |
|
Post Installation Maintenance:
Immediately after installation of your new Karelia floor, please note the following:
- Do not tape protective materials to the floor (eg cardboard, etc) - these could damage the surface
- UV radiation from the sun alters wood colour over time, especially in New Zealand, which has the highest UV-light in the world. We recommend the following:
- Do not put mats and rugs on the floor straight after the installation
- Once mats are placed (see Preventative Care below) move them around for the first 6 months
Variations in colour - such as carpet outlines - will even out over time as they are exposed to daylight
Preventative Care:
Preventing damage is the best treatment for your Karelia floor:
- Place mats on both sides of all exterior doors, so that as little grit and other dirt as possible is carried onto the floor
- Put plastic mats in entrances under shoe/coat areas to prevent water damage
- Never drag furniture or whiteware - place a carpet offcut upside down underneath the furniture and push it carefully
- Remove stains while they are still fresh - usually just a little water or a mild detergent will be sufficient
- In order to protect the floor from scratches, use felt pads under all your furniture
- Avoid scrubbing with abrasive equipment or using strong solvents
- Remove any grit or other abrasives immediately
- Take your shoes off - never wear stiletto heels
- Ensure you keep your pets' nails short
- Use a plastic mat under your office chair
- Prevent water being trodden onto the floor
- Wipe up spills immediately
- Place dishes/trays under pot plants
Cleaning & Maintenance:
Regular care of Karelia flooring involves only the following:
- Remove loose sand and dust with a vacuum cleaner or a brush
- To clean your floor more thoroughly, it can be washed with a mild detergent (pH 6-8) and a microfiber mop/pad
- Use as little water as possible when cleaning (almost dry wipe). If visible moisture does not evaporate within a minute, you are using
too much water (the key is to minimise the use of water!)
- Never use a steam mop to clean your hardwood flooring - hot steam and timber are a no go!
- Clean stains immediately
- We recommend using professional cleaning kits (microfiber mop with cleaning solution)
Removal of Stains:
The fresher the spot, the easier it will be to remove. For stain removal use the substances mentioned in the table below.
|
Stain
Asphalt, rubber, oil, show polish, soot, chocolate & grease Crayons, lipstick, felt tip pens, ball-point pen Candle wax, chewing gum Blood Fruit, berries, juices, milk, cream, soft drinks, beer, wine, coffee, tea, urine |
Stain Remover
Mineral turpentine, surgical spirit, petroleum ether, or similar Surgical spirit or denatured alcohol Freeze-spray or put a plastic bag of ice cubes on the mark, then scrape off carefully Cold water Cleansing solution or synthetic cleaning agent |
Surface Reconditioning - Oil/Wax Finished Floors Only:
How often the floor requires maintaining with oil depends on use, cleaning, exposure to sun light and personal preference. In most cases, surface reconditioning isn't necessary. For their pre-finished oil/wax timber floors, Karelia uses Osmo oils, which are available in New Zealand.
Remove loose dust and dirt from the floor with a vacuum cleaner and clean the worn area as per Cleaning & Maintenance above. There is no need to sand the surface - simply follow the Osmo instructions.
These are the Osmo product codes for the Karelia floors we offer:
Karelia Arctic, Stonewashed Ivory 3111
Karelia Antique, Stonewashed Ebony 3168
Karelia Stonewashed Clay 3192
Karelia Stonewashed Charcoal 3170
Please contact us for recommendations on where you can buy Osmo oils.
Karelia Installed in a Bach, Holiday Home or Vacant Property:
Your Karelia timber floor is made out of a natural material (wood) and reacts to changes in air humidity (the floor expands and contracts).
If a house is locked up/vacant for several weeks or months at a time, this could affect how the wooden floor behaves. For example, in summer the house heats up to higher than normal, and in winter colder than normal. In the worst case, gaps could appear (through shrinking of the boards) or the floor could start lifting (when expansion is reached with a floating floor installation). The manufacturer, importer, retailer or installer cannot be held liable for this!
Therefore, ensure the house is well ventilated while you are away - ask a neighbour to open doors or windows periodically, and if you have a ventilation system set it to its minimum level.
Karelia Installed in a Brand New House:
In a new house all building products need time to acclimatise. Paint is still drying, etc.
As above, ventilation is the key: ensure the house is properly ventilated, windows opened, etc.
Should you have any queries regarding maintaining your new Karelia floor, please don't hesitate to contact us.
KARELIA WARRANTY
Please see below the Warranty offered by the manufacturer: Karelia-Upofloor Oy.
Warranty Conditions for Multi-Layer Parquet
Produced by Karelia Upofloor Oy
We are very proud of our products, which have a factory surface treatment and a wearing layer which can be resanded several times. Together with a complete care and maintenance programme, which allows Karelia-Upofloor Oy to offer a wear warranty of 10 years for our multi-layer products with traditional T&G or our Profiloc 2G and 20 years for our multi-layers parquet products with Profiloc 5G.
This warranty is an improvement on the rights enjoyed by the customer in accordance with current national consumer legislation and without prejudice to statutory implied conditions and warranties.
1. The warranty applies to multi-layer wooden flooring (three layers or more) in original packaging bought in a country within the European Union, Norway, Switzerland, Iceland or Turkey 20150101 or later. The guarantee applies to floors installed in homes and on condition that laying, care and maintenance instructions for the floor have been adhered to throughout the warranty period.
2. The warranty covers wearing through the wearing layer of the multi layer boards where the damage exceed an area of 10*10 mm. The wearing layer is formed by the surface treatment and the entire layer of hardwood.
3. The warranty does not apply in the case of lack of or insufficient maintenance, spot wear, scratches, negligent use, use contrary to our laying, care and maintenance instructions, other neglect, damage or special circumstances which can be attributed to the end user.
Instructions with regards to laying, care and maintenance are enclosed with the product when it is delivered or available on out web page. If the instructions are lost, a new copy can be obtained directly from Karelia-Upofloor Oy or the nearest dealer.
4. The warranty is valid for ten (10) years for our multilayer products with traditional T&G or our Profiloc 2G and twenty (20) years for our multi-layers parquet products with Profiloc 5G joint system, from the date of purchase.
5. Karelia-Upofloor Oy will remedy faults for which it is responsible as specified above free of charge by repairing the fault or supplying a new product at its own discretion. If the product sold cannot be manufactured any longer or is no longer in stock, Karelia-Upofloor Oy reserves the right to supply another similar product.
The warranty does not cover any costs arising as a result of interference with anything other than the product in connection with dismantling or installation of the product or other costs or damage which arise in connection with appearance of the fault.
Karelia-Upofloor Oy is not responsible for any damage occurring either directly or indirectly, or consequential losses arising from faults which are covered by the warranty. In no event shall Karelia-Upofloor Oy liability under this warranty for any claim exceed the price paid
by the customer for the product.
Nothing in this Section 5 shall be regarded as in any way limiting or excluding any liability Karelia-Upofloor Oy may have to the customer under any relevant statutory regulations concerning product liability.
6. Complaints in respect of faults which are covered by the warranty must be sent in writing to a Karelia-Upofloor Oy dealer without delay, within 30 days from the time the fault is first noticed. If a complaint is not made in time, Karelia-Upofloor Oy warranty obligation
lapses. The complaint should be accompanied by proof of purchase and a photograph of the damage.
You can download the Karelia Warranty here.
KARELIA PRODUCT DATA / SPECIFICATIONS
Product Description
- 14mm, prefinished, engineered timber flooring (floating/glued down) - manufactured according to EN 13489
Technical Properties
- Length 2266 / 2000 / 1800mm
- Width 188 / 138mm
- Thickness Approx. 14mm
- Hardwood surface thickness Approx. 3.5mm (±0.5mm tolerance)
- Middle layer thickness Approx. 9mm (pine / spruce)
- Bottom layer thickness Approx. 2mm (spruce veneer)
- Deviation of squareness Max 0.2mm
- Locking system Profiloc, Licenced to Valinge's patent family, 2G-system or 5G-system
- Height difference Max 0.2mm
- Moisture during first delivery 7.5 ±1% tolerance
- Height difference (lipping) Max 0.2mm
- Hardness on Brinell Scale European Oak 2.9 - 3.7
Merbau 4.1 - 4.9
Ash 3.3 - 4.1
Surface Layer Coating System
LACQUER:
- Gloss: standard coating 35° ±5°, Matt coating 12° ±5°
- UV-hardened solvent free polyacrylate finish
OIL/WAX:
- A durable, hardwax surface treatment using a synthetic wax
Test / Classification Results - Lacquer Only
Test Description Standard Results
Abrasion resistance (12/16) ENV 13696 (12/16) 2200 – 2400
Scratch resistance (Erichsen) No visible changes after 500 revs.
Adhesion (Cross cut) EN ISO 2409 GT 0/5B
Adhesion (Stridsmann) 32.4 N (SC2)
Chemical resistance EN 13442 5
Possibility to overcoat Approved
Durability CTBA Classified 31
Bonding - Oil/Wax Only
- E1-classified UF-resin (EN 717-1)
Packaging and Marking (EN 13489)
- One pack containing eight boards
- Pack weight approx. 16.6kg - 25kg, dependent on product
- Packs are covered with cardboard and shrink wrapped with PE-membrane
- Marking on the board back for tracing
Safety, Quality and Additional Data
- Karelia holds the ISO 9001 Quality Management System Certificate
- All products meet the requirements of the Finnish M1-emission classification and the European E1 formaldehyde classification (EN
14342:2005) for construction materials:
- Total emission of volatile organic compounds (TVOC) 0.0 <1.0 mg/m3
- Emission of formaldehyde (ENV 717-1) < 0.001 mg/m3
- Reaction to Fire: Products meet the requirements of class Dfl-s1 (EN 14342:2005 & EN 13501-1 part 1)
- Thermal Conductivity (EN 12664): 0,110 W/mK
- Pentachlorophenol Content (CEN/TR 14823): <5 ppm
- Slipperiness: DIN 51130:2004 Low Slip Potential (Contact QFL for WET ratings)
- Biological Durability (EN350-2): Class 1
- Harmonised Technical Specification: EN 14342: 2005 +A 2008
- CE marking: CE Group 513 (EN 14342:2005+A1 2008)
Environment
- Karelia-Upofloor Oy holds the ISO 14001 Environmental management system certificate
- PEFC CoC certificate (Chain-of-Custody) Certificate - PEFC Standard 2002:2013
- M1 / BREEAM NOR Certification
KARELIA DOWNLOAD CENTRE
Please find below all downloads relating to Karelia timber flooring.
|
| ||||||||||||||
|
| ||||||||||||||||
Quality Floors - 100% Kiwi Owned & Operated
|
ABOUT QFL
Quality Floors Ltd (QFL) has been operating since 2006 and has become one of the leading importers of prefinished and unfinished engineered timber floors in New Zealand. All our products are of high quality and have comprehensive warranties. You can also find us at https://archipro.co.nz/professional/quality-floors.
|